Difference between revisions of "ViRHaS"
(→Development) |
|||
| (12 intermediate revisions by the same user not shown) | |||
| Line 10: | Line 10: | ||
|start=2016/10/20 | |start=2016/10/20 | ||
|end=2016/07/07 | |end=2016/07/07 | ||
| − | |status= | + | |status=Closed |
|level=Bs | |level=Bs | ||
|type=Course | |type=Course | ||
}} | }} | ||
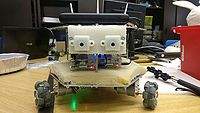
| − | ViRHaS is | + | ViRHaS is an omnidirectional robot, based on Triskar model, equipped with two Raspberry Pi Cameras. |
These cameras can be used either to watch video streaming from multiple devices, either to control robot in 3D mode: | These cameras can be used either to watch video streaming from multiple devices, either to control robot in 3D mode: | ||
this mode is available both for smartphone (inside a VRBOX) and for PC plugged to a 3D-ready screen. | this mode is available both for smartphone (inside a VRBOX) and for PC plugged to a 3D-ready screen. | ||
| Line 21: | Line 21: | ||
Source code: https://github.com/michele-bertoni/ViRHaS | Source code: https://github.com/michele-bertoni/ViRHaS | ||
| − | == | + | Video demo: https://youtu.be/8FnhCosYoxI |
| + | |||
| + | Pdf documentation: https://github.com/michele-bertoni/ViRHaS/blob/master/ViRHaS_doc.pdf | ||
| + | |||
| + | ==Structure== | ||
ViRHaS is structured into 3 parts: | ViRHaS is structured into 3 parts: | ||
| Line 30: | Line 34: | ||
- User device: it may be any modern electronical device, for example laptop, smartphone, desktop computer, etc... ; the device receives video streaming and sends controls. | - User device: it may be any modern electronical device, for example laptop, smartphone, desktop computer, etc... ; the device receives video streaming and sends controls. | ||
| − | == | + | ==Software components== |
All software components may be divided into four parts: | All software components may be divided into four parts: | ||
| Line 44: | Line 48: | ||
- Master Raspberry receives default commands, and from these calculates strafe, forward and angular components of the speed vector, then simplifies each component to a single byte for | - Master Raspberry receives default commands, and from these calculates strafe, forward and angular components of the speed vector, then simplifies each component to a single byte for | ||
| − | a | + | a simpler parsing by the Arduino; |
- Arduino receives a 4 bytes string, composed by the 3 values and the string terminator 'n'; after parsing, it computes inverse kinematics and estimates each wheel speed; finally, target | - Arduino receives a 4 bytes string, composed by the 3 values and the string terminator 'n'; after parsing, it computes inverse kinematics and estimates each wheel speed; finally, target | ||
| Line 59: | Line 63: | ||
Then, I developed the physical robot, the hardware component of the project, which is composed by 3 motors, 3 omni-wheels, 2 drivers, 1 Arduino Mega, 2 Raspberry Pi 3.0, 2 Raspberry Pi Cameras (v2.1), 1 router, 1 LiPo 12V battery, 1 LiPo 5V powerbank and all necessary wires. | Then, I developed the physical robot, the hardware component of the project, which is composed by 3 motors, 3 omni-wheels, 2 drivers, 1 Arduino Mega, 2 Raspberry Pi 3.0, 2 Raspberry Pi Cameras (v2.1), 1 router, 1 LiPo 12V battery, 1 LiPo 5V powerbank and all necessary wires. | ||
| − | In the end, I wrote the code for Arduino: I developed library MR001004.h to interface drivers(C++), I adapted library Triskar.h, to maintain | + | In the end, I wrote the code for Arduino: I developed library MR001004.h to interface drivers(C++), I adapted library Triskar.h, to maintain compatibility with drivers(C++) and then I wrote the Arduino code for serial communication, data parsing and ViRHaS movement. |
== ViRHaS App == | == ViRHaS App == | ||
| Line 71: | Line 75: | ||
- Android: perfectly working | - Android: perfectly working | ||
| − | - iOS: theoretically, software should work, but, since this is a closed OS | + | - iOS: theoretically, software should work, but, since this is a closed OS I could not test it |
| − | - Windows: unfortunately the application on this OS has two known issues, both caused by Windows itself: the first is the | + | - Windows: unfortunately, the application on this OS has two known issues, both caused by Windows itself: the first is the incompatibility of the library QtGamepad with this OS, the second is a bug concerning window update immediately after stopping OpenGL. |
Regarding the app structure, in the main menu, user can choose between some features: the most important ones are Connect and Settings. | Regarding the app structure, in the main menu, user can choose between some features: the most important ones are Connect and Settings. | ||
| + | |||
[[File:Virhas app home.png]] | [[File:Virhas app home.png]] | ||
| − | Settings page may be used to edit almost every parameter, both | + | Settings page may be used to edit almost every parameter, both view and control; favourite settings may be stored and automatically loaded when application starts. Preview button shows a 5 seconds preview of canvases size and position. |
| + | |||
[[File:Virhas application settings.png]] | [[File:Virhas application settings.png]] | ||
Connect page is the one used for playing with the robot: the entire page is filled with 2 canvases, inside which streaming is displayed. To return the main menu and close connections, user must click or tap any part of the screen, then a small arrow button is displayed in the bottom left angle for a few seconds: by clicking that button the game returns to the main menu and all open sockets are closed. | Connect page is the one used for playing with the robot: the entire page is filled with 2 canvases, inside which streaming is displayed. To return the main menu and close connections, user must click or tap any part of the screen, then a small arrow button is displayed in the bottom left angle for a few seconds: by clicking that button the game returns to the main menu and all open sockets are closed. | ||
| + | |||
| + | To compile and install ViRHaS application, you need QtCreator, which can be downloaded here: https://www.qt.io/download-open-source/ . During installation process, select all libraries, otherwise, something should not work fine when compiling project. To compile an apk file for Android, you need the Android version of QtCreator (https://www.qt.io/download-open-source/#section-2); then, after setting up Android compiler, plug the smartphone to the computer USB (debug mode) and run compiler. | ||
| + | |||
| + | == ViRHaS controller == | ||
| + | This Qt command line program is not as multiplatform as the application, because it uses some libraries available only on Linux: one of these libraries is v4l2 (Video4Linux2), which is not available, for example, on Windows . | ||
| + | |||
| + | When program starts with no parameters, it reads settings to understand if this Raspberry is the master or the slave one. This setting is automatically set permanently by running once the program with the parameter "-c" for the master and "-s" for the slave. | ||
| + | |||
| + | [[File:Virhas_controller.png]] | ||
| + | |||
| + | If Raspberry is slave, the program creates only one server for the video, while if it's master, the program creates one more server to handle controls reception. When a socket is opened between client and server, if it's a video socket, camera starts shooting and ByteArrays containing frames are sent over the socket; instead, on the control socket, ViRHaS controller receives default commands, then elaborates them and sends them to the Arduino, as described before. | ||
| + | |||
| + | To compile and install this software on Raspberry Pi, since Qt Creator IDE may be too heavy, I suggest installing the command-line compiler, which unfortunately comes only with default packages; the following packages must be installed with command "sudo apt-get install <library_name>": | ||
| + | |||
| + | - qt5-default: Qt compiler | ||
| + | |||
| + | - libv4l-dev: v4l2 libraries | ||
| + | |||
| + | - libqt5websockets5-dev: Qt libraries for WebSockets (if it doesn't compile, install also qtwebsockets5-dbg) | ||
| + | |||
| + | - v4l-utils: Camera information (usage: v4l2-ctl --list-formats-ext) | ||
| + | |||
| + | - libgl1-mesa-dev: openGL libraries | ||
| + | |||
| + | - libqt5serialport5-dev: serial communication libraries | ||
| + | |||
| + | In order to compile the project, you have to be in the same directory as .pro file, then digit the commands "qmake" and then "make": the executable will be in the same directory. | ||
| + | Before launching the controller, a few more steps are necessary: on Raspberry Pi, camera and serial are not enabled by default, so type "sudo raspi-config", then enable both camera and serial; then add the module "bcm2835-v4l2" with "sudo nano /etc/modules" and, after reboot, everything should work fine. | ||
| + | Now navigate to the directory where you compiled the controller executable and type "./controller -c" if this Raspberry is connected to the Arduino Mega, otherwise "./controller -s": this process is reversible and you can change mode in any moment. Finally type "./controller" to launch ViRHaS controller. | ||
| + | |||
| + | == ViRHaS Arduino == | ||
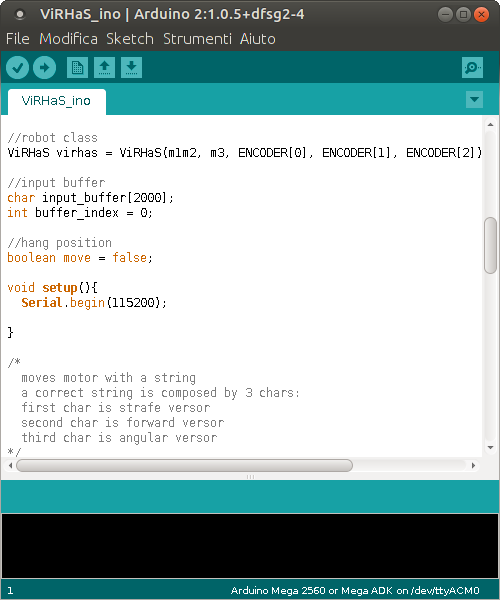
| + | ViRHaS_ino software is simple: on boot, the Arduino instantiates 3 Encoder objects (library Encoder.h), 2 MR001004 objects (library MR001004.h, written by me for motor drivers MR001-004) and from these objects instantiates a ViRHaS object (library ViRHaS.h, created by me, modifying the Triskar.h library); setup() opens serial connection, then loop() reads serial connection and computes PID. | ||
| + | |||
| + | [[File:Virhas_ino.png]] | ||
| + | |||
| + | To compile ViRHaS_ino.ino, add all necessary libraries and then just compile for Arduino Mega 2560. | ||
| + | |||
| + | == ViRHaS Robot == | ||
| + | The ViRHaS robot is built on the base of a Triskar model, a holonomic three-wheeled robot. ViRHaS is bigger than Triskar, because of the space occupied by Raspberry Pi, cameras and router. | ||
| + | ViRHaS has three layers: | ||
| + | |||
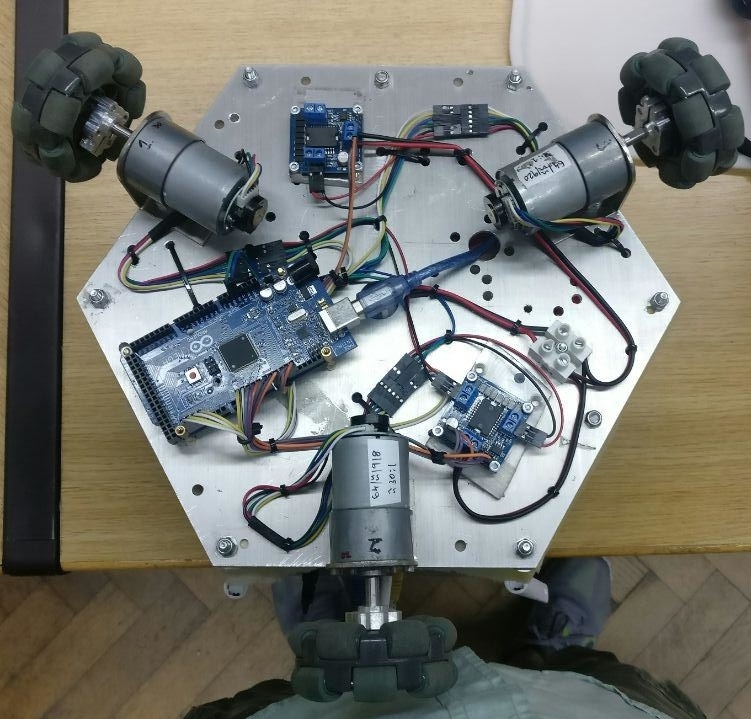
| + | - the bottom layer is the actual robot base and hangs motors, drivers, Arduino and all wires between them | ||
| + | |||
| + | [[File:virhas_layer0.jpg]] | ||
| + | |||
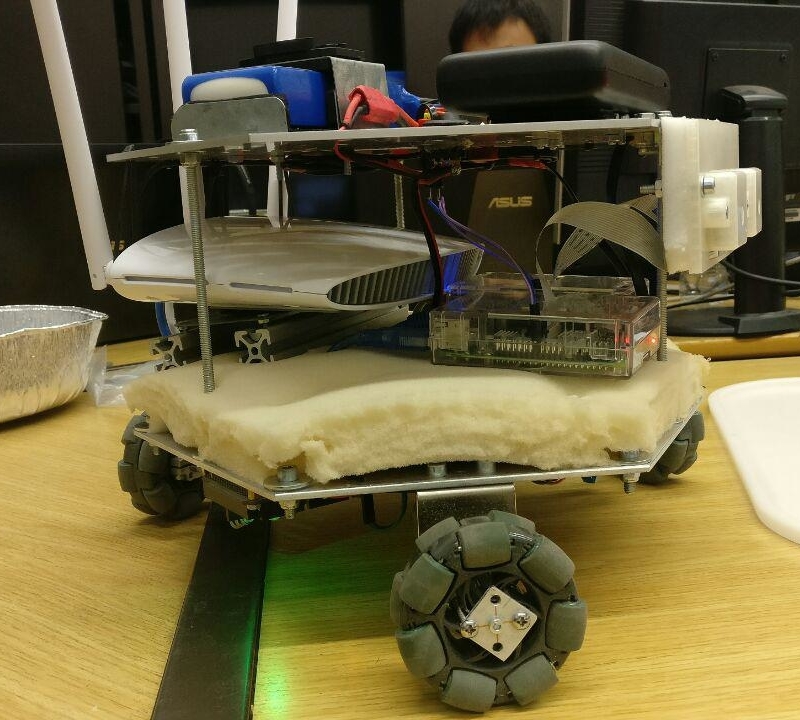
| + | - the middle layer is made of foam rubber and is fixed to the layer 0: foam is necessary for isolation and is also good for hiding cables and bolts under it; this layer hangs 2 Raspberrries and the router | ||
| + | |||
| + | [[File:virhas_layer1.jpg]] | ||
| + | |||
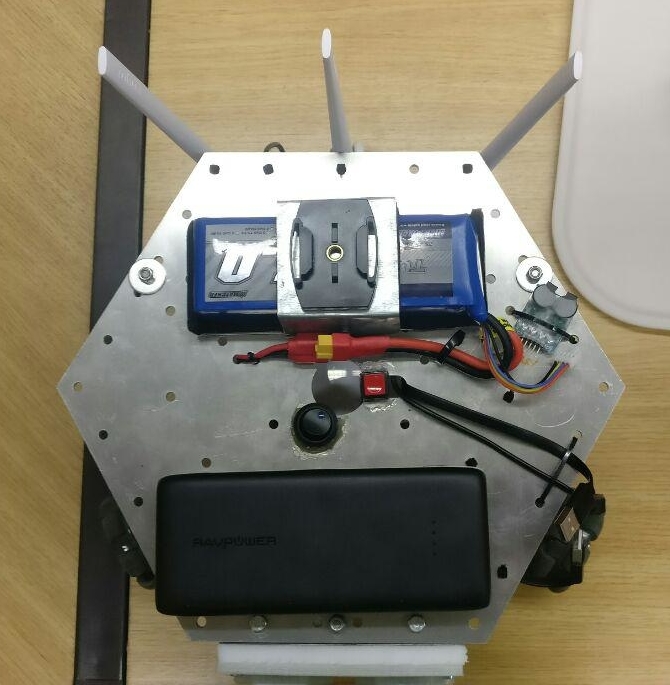
| + | - top layer is fixed to bottom layer with three threaded rods and some dice; the bottom face of this layer hangs cameras support and hides power cables, while the top face hangs the two | ||
| + | batteries, the LiPo buzzer and two buttons (motors and raspberries' switches). | ||
| + | |||
| + | [[File:virhas_layer2.jpg]] | ||
| + | |||
| + | |||
| + | == Configurations == | ||
| + | Robot, for working fine, needs some additional settings: | ||
| + | |||
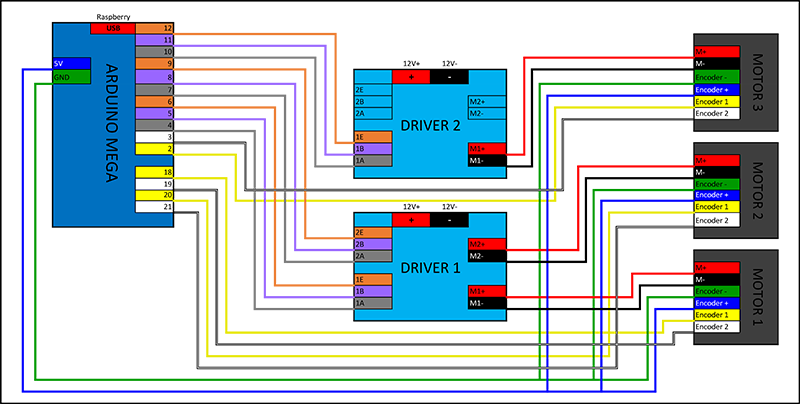
| + | - Arduino and drivers' wirings - Arduino has 9 output, 6 input and 2 power pins: outputs are pins from 4 to 12, inputs are all interrupt pins (2, 3, 18-20) and power pins are 5V and GND; the following schema describes completely all wirings | ||
| + | |||
| + | [[File:Virhas_pins_connections_rid.png]] | ||
| + | |||
| + | (higher resolution here: https://github.com/michele-bertoni/ViRHaS/blob/master/pins_connections.pdf) | ||
| + | |||
| + | - Arduino must be connected to the master Raspberry Pi via USB: this both gives power to Arduino and allows serial communication | ||
| + | |||
| + | - Motor drivers must be directly connected to the 12V battery: the two drivers must be connected in parallel, with a switch between battery and drivers | ||
| + | |||
| + | - Raspberry Pis and router must be connected to the 5V USB powerbank | ||
| + | |||
| + | - Raspberries must be connected to the router with ethernet cables: IP address of the master Pi must be set to 192.168.1.3, while the one of the slave Pi must be set to 192.168.1.4; for doing this, open router settings and in LAN page pair each MAC address with the right LAN IP | ||
| + | |||
| + | - Raspberries must have a power-off button: since unplugging before shutting them down could cause errors, a switch is necessary; I recommend following instructions in this video: https://www.youtube.com/watch?v=Ns0JdZrXwdk | ||
| + | |||
| + | - Raspberry may be set to CLI Autologin mode to speed up boot: type "sudo raspi-config", then edit the settings from that menu | ||
| + | |||
| + | - ViRHaS controller must be executed on boot: type "crontab -e", then add a line on the bottom of the file as follows (controller executable is inside /home/pi/controller directory) | ||
| + | @reboot /home/pi/controller/controller | ||
| + | |||
| + | - Cameras must be fixed tightly so that they can't move: the focal distance between the two cameras must be about 6.5cm for a medium 3D effect; if this distance is increased 3D effect will be higher for farther distances, but nearer objects will be split by eyes into two different objects; conversely, if focal distance is decreased, nearest object will be always seen fine, but 3D effect will be lower | ||
| + | |||
| + | |||
| + | == Conclusions == | ||
| + | ViRHaS is only a simple game, but at the same time is very amusing. Unfortunately, low price hardware constrains the user experience: VRBox 3D is mediocre, smartphone is way slower than a PC (so cameras resolution must be decreased to keep FPS stable) and router connection radius is about 20 meters. In my opinion with better hardware, an improved version of ViRHaS can be used even for military purposes: 3D vision and virtual reality headset helps a lot when driving any robot. | ||
| + | On the other hand, ViRHaS software would perfectly work with better hardware: when, in a few years, we'll have faster and cheaper hardware, ViRHaS can be upgraded with no effort. | ||
| + | |||
| + | If only used for ludic purposes, ViRHaS is already great: in fact, latency is low (<0.1 s) and video streaming with one camera can be over 720p 30FPS (480p each with two cameras). Also, high application customization is helpful: even if they're the same model, the two cameras may be lightly different, but changing a few settings, can immediately solve this problem. | ||
| + | |||
| + | I'm really satisfied for my work on ViRHaS and I would like to continue working on it: improvements I would like to do are: | ||
| + | |||
| + | - add servo motors to rotate cameras when rotating head | ||
| + | |||
| + | - use H264 protocol instead of MJPG | ||
| + | |||
| + | - find a way to use UDP without losing many packets so that I can use multicast and access the same camera from different devices at the same time | ||
| + | |||
| + | - improve robot appearance | ||
| + | |||
| + | - add sensors for collision avoidance | ||
Latest revision as of 22:09, 8 July 2017
ViRHaS
| |
| Short Description: | Omnidirectional robot, drivable in virtual reality |
| Coordinator: | AndreaBonarini (andrea.bonarini@polimi.it) |
| Tutor: | AndreaBonarini (andrea.bonarini@polimi.it) |
| Collaborator: | |
| Students: | MicheleBertoni (michele2.bertoni@mail.polimi.it) |
| Research Area: | Robotics |
| Research Topic: | Robot development |
| Start: | 2016/10/20 |
| End: | 2016/07/07 |
| Status: | Closed |
| Level: | Bs |
| Type: | Course |
ViRHaS is an omnidirectional robot, based on Triskar model, equipped with two Raspberry Pi Cameras. These cameras can be used either to watch video streaming from multiple devices, either to control robot in 3D mode: this mode is available both for smartphone (inside a VRBOX) and for PC plugged to a 3D-ready screen.
Source code: https://github.com/michele-bertoni/ViRHaS
Video demo: https://youtu.be/8FnhCosYoxI
Pdf documentation: https://github.com/michele-bertoni/ViRHaS/blob/master/ViRHaS_doc.pdf
Contents
Structure
ViRHaS is structured into 3 parts:
- Raspberry Pis are the hub of the entire robot: they handle both video and control streaming: one raspberry, the one with local address 192.168.1.3 is the master, while the other (192.168.1.4) is a slave device and only handles video transmission;
-Arduino Mega is used to control the motors: it's a slave device, controlled by master Raspberry Pi: Raspberry sends over USB serial to the Arduino a byte vector, which contains all speed components; then Arduino computes PID and control motors over PWM;
- User device: it may be any modern electronical device, for example laptop, smartphone, desktop computer, etc... ; the device receives video streaming and sends controls.
Software components
All software components may be divided into four parts:
- Video capture: performed only by Raspberry Pis, uses v4l2 libraries to get MJPG streaming from cameras; all data is stored in ByteArrays;
- Communication: performed by all the parts of the robot, in particular using WebSockets from Raspberries to user device (and viceversa) and via Usb Serial communication from Raspberry to Arduino Mega;
- Video visualization: obviously, only user device can display video streaming: once received a new ByteArray containing a frame, the device loads the JPG image and displays it in the right position of the screen (user might change settings) using OpenGL and hardware acceleration of the GPU, if present;
- Control handling: each device, except the slave Pi, handle control:
   - user device is directly connected to the controller, which can be any kind supported by user device; the gamepad is handled transparently from the user device, which combines a key to
     a default command (for example throttle, direction, etc...); this association may be changed by the user;
   - Master Raspberry receives default commands, and from these calculates strafe, forward and angular components of the speed vector, then simplifies each component to a single byte for
     a simpler parsing by the Arduino;
   - Arduino receives a 4 bytes string, composed by the 3 values and the string terminator 'n'; after parsing, it computes inverse kinematics and estimates each wheel speed; finally, target
     speed enters the PID loop and the real speed is sent to each wheel via PWM.
Development
The first part of the project I developed was User Application: written in C++, using Qt libraries, this application is multiplatform, reliable and user-friendly: Qt compiler can generate executable file from the source code for almost every device.
Meanwhile, I developed "controller", which is the software running on Raspberry Pi: this is a simple command line interface which handles both communication and video capture. This software works in any device with a camera and v4l2 libraries installed. This is also written in C++, using Qt libraries.
Then, I developed the physical robot, the hardware component of the project, which is composed by 3 motors, 3 omni-wheels, 2 drivers, 1 Arduino Mega, 2 Raspberry Pi 3.0, 2 Raspberry Pi Cameras (v2.1), 1 router, 1 LiPo 12V battery, 1 LiPo 5V powerbank and all necessary wires.
In the end, I wrote the code for Arduino: I developed library MR001004.h to interface drivers(C++), I adapted library Triskar.h, to maintain compatibility with drivers(C++) and then I wrote the Arduino code for serial communication, data parsing and ViRHaS movement.
ViRHaS App
ViRHaS application is simple but complete; its strength is cross-compatibility, in fact it works fine on almost every operating system:
- Linux (any distribution): perfectly working
- MacOS: perfectly working
- Android: perfectly working
- iOS: theoretically, software should work, but, since this is a closed OS I could not test it
- Windows: unfortunately, the application on this OS has two known issues, both caused by Windows itself: the first is the incompatibility of the library QtGamepad with this OS, the second is a bug concerning window update immediately after stopping OpenGL.
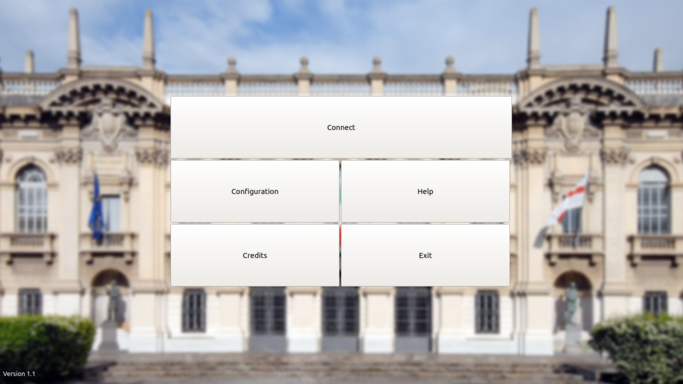
Regarding the app structure, in the main menu, user can choose between some features: the most important ones are Connect and Settings.
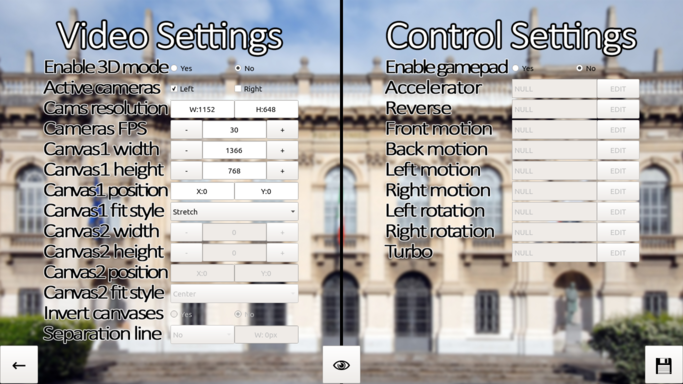
Settings page may be used to edit almost every parameter, both view and control; favourite settings may be stored and automatically loaded when application starts. Preview button shows a 5 seconds preview of canvases size and position.
Connect page is the one used for playing with the robot: the entire page is filled with 2 canvases, inside which streaming is displayed. To return the main menu and close connections, user must click or tap any part of the screen, then a small arrow button is displayed in the bottom left angle for a few seconds: by clicking that button the game returns to the main menu and all open sockets are closed.
To compile and install ViRHaS application, you need QtCreator, which can be downloaded here: https://www.qt.io/download-open-source/ . During installation process, select all libraries, otherwise, something should not work fine when compiling project. To compile an apk file for Android, you need the Android version of QtCreator (https://www.qt.io/download-open-source/#section-2); then, after setting up Android compiler, plug the smartphone to the computer USB (debug mode) and run compiler.
ViRHaS controller
This Qt command line program is not as multiplatform as the application, because it uses some libraries available only on Linux: one of these libraries is v4l2 (Video4Linux2), which is not available, for example, on Windows .
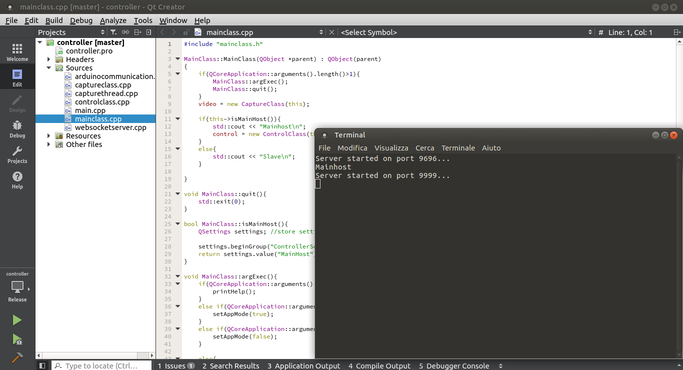
When program starts with no parameters, it reads settings to understand if this Raspberry is the master or the slave one. This setting is automatically set permanently by running once the program with the parameter "-c" for the master and "-s" for the slave.
If Raspberry is slave, the program creates only one server for the video, while if it's master, the program creates one more server to handle controls reception. When a socket is opened between client and server, if it's a video socket, camera starts shooting and ByteArrays containing frames are sent over the socket; instead, on the control socket, ViRHaS controller receives default commands, then elaborates them and sends them to the Arduino, as described before.
To compile and install this software on Raspberry Pi, since Qt Creator IDE may be too heavy, I suggest installing the command-line compiler, which unfortunately comes only with default packages; the following packages must be installed with command "sudo apt-get install <library_name>":
- qt5-default: Qt compiler
- libv4l-dev: v4l2 libraries
- libqt5websockets5-dev: Qt libraries for WebSockets (if it doesn't compile, install also qtwebsockets5-dbg)
- v4l-utils: Camera information (usage: v4l2-ctl --list-formats-ext)
- libgl1-mesa-dev: openGL libraries
- libqt5serialport5-dev: serial communication libraries
In order to compile the project, you have to be in the same directory as .pro file, then digit the commands "qmake" and then "make": the executable will be in the same directory. Before launching the controller, a few more steps are necessary: on Raspberry Pi, camera and serial are not enabled by default, so type "sudo raspi-config", then enable both camera and serial; then add the module "bcm2835-v4l2" with "sudo nano /etc/modules" and, after reboot, everything should work fine. Now navigate to the directory where you compiled the controller executable and type "./controller -c" if this Raspberry is connected to the Arduino Mega, otherwise "./controller -s": this process is reversible and you can change mode in any moment. Finally type "./controller" to launch ViRHaS controller.
ViRHaS Arduino
ViRHaS_ino software is simple: on boot, the Arduino instantiates 3 Encoder objects (library Encoder.h), 2 MR001004 objects (library MR001004.h, written by me for motor drivers MR001-004) and from these objects instantiates a ViRHaS object (library ViRHaS.h, created by me, modifying the Triskar.h library); setup() opens serial connection, then loop() reads serial connection and computes PID.
To compile ViRHaS_ino.ino, add all necessary libraries and then just compile for Arduino Mega 2560.
ViRHaS Robot
The ViRHaS robot is built on the base of a Triskar model, a holonomic three-wheeled robot. ViRHaS is bigger than Triskar, because of the space occupied by Raspberry Pi, cameras and router. ViRHaS has three layers:
- the bottom layer is the actual robot base and hangs motors, drivers, Arduino and all wires between them
- the middle layer is made of foam rubber and is fixed to the layer 0: foam is necessary for isolation and is also good for hiding cables and bolts under it; this layer hangs 2 Raspberrries and the router
- top layer is fixed to bottom layer with three threaded rods and some dice; the bottom face of this layer hangs cameras support and hides power cables, while the top face hangs the two batteries, the LiPo buzzer and two buttons (motors and raspberries' switches).
Configurations
Robot, for working fine, needs some additional settings:
- Arduino and drivers' wirings - Arduino has 9 output, 6 input and 2 power pins: outputs are pins from 4 to 12, inputs are all interrupt pins (2, 3, 18-20) and power pins are 5V and GND; the following schema describes completely all wirings
(higher resolution here: https://github.com/michele-bertoni/ViRHaS/blob/master/pins_connections.pdf)
- Arduino must be connected to the master Raspberry Pi via USB: this both gives power to Arduino and allows serial communication
- Motor drivers must be directly connected to the 12V battery: the two drivers must be connected in parallel, with a switch between battery and drivers
- Raspberry Pis and router must be connected to the 5V USB powerbank
- Raspberries must be connected to the router with ethernet cables: IP address of the master Pi must be set to 192.168.1.3, while the one of the slave Pi must be set to 192.168.1.4; for doing this, open router settings and in LAN page pair each MAC address with the right LAN IP
- Raspberries must have a power-off button: since unplugging before shutting them down could cause errors, a switch is necessary; I recommend following instructions in this video: https://www.youtube.com/watch?v=Ns0JdZrXwdk
- Raspberry may be set to CLI Autologin mode to speed up boot: type "sudo raspi-config", then edit the settings from that menu
- ViRHaS controller must be executed on boot: type "crontab -e", then add a line on the bottom of the file as follows (controller executable is inside /home/pi/controller directory)
@reboot /home/pi/controller/controller
- Cameras must be fixed tightly so that they can't move: the focal distance between the two cameras must be about 6.5cm for a medium 3D effect; if this distance is increased 3D effect will be higher for farther distances, but nearer objects will be split by eyes into two different objects; conversely, if focal distance is decreased, nearest object will be always seen fine, but 3D effect will be lower
Conclusions
ViRHaS is only a simple game, but at the same time is very amusing. Unfortunately, low price hardware constrains the user experience: VRBox 3D is mediocre, smartphone is way slower than a PC (so cameras resolution must be decreased to keep FPS stable) and router connection radius is about 20 meters. In my opinion with better hardware, an improved version of ViRHaS can be used even for military purposes: 3D vision and virtual reality headset helps a lot when driving any robot. On the other hand, ViRHaS software would perfectly work with better hardware: when, in a few years, we'll have faster and cheaper hardware, ViRHaS can be upgraded with no effort.
If only used for ludic purposes, ViRHaS is already great: in fact, latency is low (<0.1 s) and video streaming with one camera can be over 720p 30FPS (480p each with two cameras). Also, high application customization is helpful: even if they're the same model, the two cameras may be lightly different, but changing a few settings, can immediately solve this problem.
I'm really satisfied for my work on ViRHaS and I would like to continue working on it: improvements I would like to do are:
- add servo motors to rotate cameras when rotating head
- use H264 protocol instead of MJPG
- find a way to use UDP without losing many packets so that I can use multicast and access the same camera from different devices at the same time
- improve robot appearance
- add sensors for collision avoidance
